Article
The AV Family Computer is a great system. It plays all your Famicom and Disk System games perfectly, it’s got native AV output, and the best of all, it works standard NES controllers! But if you try to play Duck Hunt or any other light gun game with a standard NES Zapper plugged into the second controller port like you do with your NES, you’ll quickly find out that the Zapper will not respond. Is your AV Famicom or Zapper broken? No, the AV Famicom is expecting a Famicom light gun plugged into the 15-pin expansion port at the side, just like a regular Famicom does. The necessary connections haven’t been made to the NES controller port, since the Zapper wasn’t sold in Japan.
There’s an alternative to shelling out the big bucks for a Famicom light gun. With minimal soldering skills, you can make the necessary connections to have a fully functional NES Zapper in your AV Famicom!
For this project you’ll need:
- Gamebit screwdriver for opening your AV Famicom
- Phillips screwdriver
- Low wattage, fine-tip soldering iron
- Electronics solder (rosin core, 60/40)
- A few inches of thin, stranded core wire
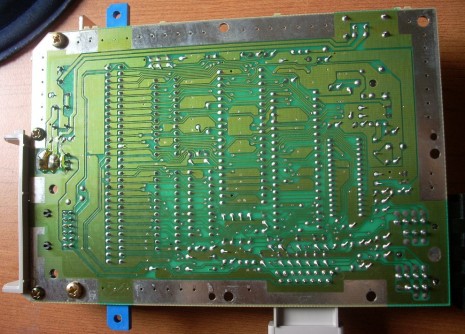
First, open up your AV Famicom with your Gamebit screwdriver. Remove the screws that hold the RF shielding and the mainboard to the case, store them separately so that you remember where they all go. Once you’ve freed the mainboard from the plastic casing, remove it and flip it so that the solder side is facing you, and the white 15-pin expansion port is facing down.

Make sure that the mainboard looks like this. Now, focus on the bottom right part of the board. We’ll be soldering two wires from the Expansion port pins to the second NES controller port pins:
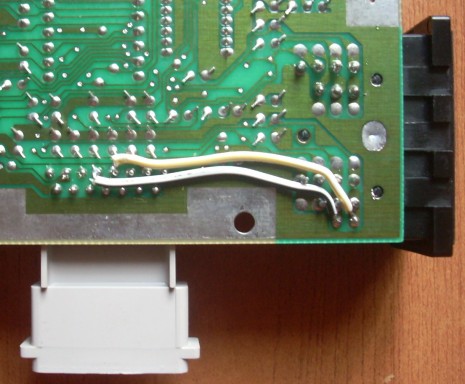
The solder points circled with the letters A and B is where you’ll solder your wires. Trim two pieces of wire to length, strip and tin the ends, then solder one wire between both point As and the other one between both point Bs. Simple!
I recommend putting some fresh solder on the marked points of the board. This will make your soldering easier. Make sure the solder isn’t bridging adjacent pins (if there is, just heat the offending solder with your iron and wipe it off. In more severe cases, use solder braid or a desoldering pump).
The final product should look like this:
Once again, make a final inspection of the area, remove any solder bridges and stray blobs.
Now put the AV Famicom mainboard back on its plastic shell, replace the RF shielding and screws in reverse order, put the top cover on making sure that the Power switch lines up correctly, replace the screws that hold the casing together, hook up your AV Famicom to the TV, load a light gun cartridge such as Duck Hunt or Hogan’s Alley, plug your NES Zapper into controller port 2, turn it on, and enjoy your Zapper-enabled AV Famicom!
If the Zapper doesn’t work, check your wiring. Make sure you’ve made the right connections, and that the solder isn’t bridging unwanted pins together. Try to avoid using thick or too long wires, since it will make reassembly difficult.


